MusicService

MusicServiceLogo

Music sync Service (youtube-dl-sync)
Release version Docker Pulls DevOps Build License Issues


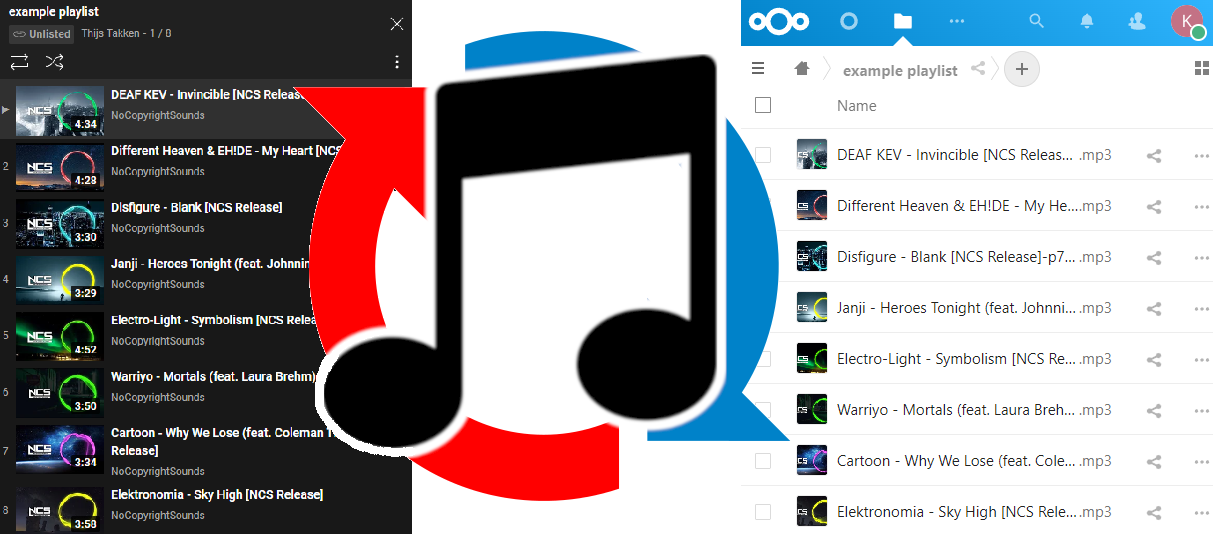
A tool that synchronizes your YouTube playlists and other music providers with your Cloud Storage like Nextcloud as MP3s.

What does it do? ✨


syncShowcase

How to install

The Music Service is a microservice application and runs as a Docker container. Because of using Docker, every installation runs the same, for everyone. This brings programming efficiency and improves reliability. Docker image release

:warning: You must have Docker installed: Either the Docker Desktop (with GUI) or Engine (no GUI) installed on your system.

:information_source: Tip: If you just want to test this application, luckily there is a good tool to use. Just do docker run -d -p 8080:80 nextcloud to start a fresh Nextcloud environment. When started, go to http://localhost:8080/ in some cases you have to replace localhost with your computers IP. And you can continue to follow the steps below!

:information_source: Recommendation: For the best experience, install this container on a computer/server which runs 24/7, so you will always have your music in sync.


  1. Prepare the code (required):
    • Option 1 Docker Compose (recommended): Copy the docker-compose file contents to your editor and follow the steps
    • Option 2 (Docker run): Copy the code below to your favorite editor, Notepad, Word etc.
docker run -d \
 --name musicservice \
 --restart=always \
 -v config:/config \
 -v musiccache:/music \
 -e URL=https://demo2.nextcloud.com/remote.php/dav/files/kA2kSpbk2tMwCPpB/ \
 -e DIRECTORY=/some/01%20my%20music \
 -e USERNAME=kA2kSpbk2tMwCPpB \
 -e PASSWORD=demo \
 -e INTERVAL=5 \
thijstakken/musicservice:latest

Before you can run the docker-compose or docker run command, you will first have to make a few changes.


syncShowcase

  1. Configure URL (required):

    1. Go to your Nextcloud website
    2. Go to the “files” menu at the top
    3. Now in the lower left corner, select “Settings”
    4. Copy the whole WebDAV URL you see there
    5. And place it after the URL=


  1. Configure DIRECTORY (required):

    • Option 1: You can leave it empty like this -e DIRECTORY= \, then it will save the files to the root directory off your cloud storage. (not recommended)


    • Option 2: Or you can specify a custom directory, like your music folder:
      1. Navigate to your music folder in Nextcloud
      2. In the URL you have to copy the path, everything between dir= and the &fileid=2274
      3. And then copy it to the DIRECTORY variable, example: /some/01%20my%20music

    syncShowcase


syncShowcase

  1. Configure USERNAME (required):
    1. Go to your Nextcloud webpage and and click on your user-icon in the top right
    2. Click “View profile”
    3. Copy and paste your username in the USERNAME variable


  1. Configure PASSWORD (required):

    • Option 1: (account without 2FA multifactor)
      1. Copy your password into the PASSWORD variable


    syncShowcase

    • Option 2: (account has 2FA multifactor protection)
      1. Go to the right top corner of your Nextcloud website and click the user-icon
      2. Click on Settings


    syncShowcase

    1. In the left bar, go to “Security”


    1. Scroll down to the bottom where you will find Devices & sessions

    syncShowcase

    1. Fill in an app name like musicservice
    2. Click Create new app password
    3. Copy the code that appears (53Xqg-…) into the PASSWORD variable

    Copy this app password


  1. Configure INTERVAL (optional):
    By default it’s set to 5 if you don’t specify anything. This is true even if you leave the whole INTERVAL variable out of the command.
    If you want to run the script more often or less often, you can just put in a number.


  1. Open a terminal and run your command!
    • If you did the steps with the docker-compose file, do docker compose up -d (make sure your command line interface is active in the same directory as where the docker-compose.yml file lives).
    • If you did the steps with the docker run command, paste it in your command line interface and run it.
  2. That’s all! If everything is correct, it will create the container, mount the volumes with the configuration and then do it’s first run. Let it run for a minute or so. If everything works you should see a new folder and song in your cloud storage. If that happened everything is working fine.
    But if this is not the case, the program crashed or it’s taking longer then 5 minutes, then you should check out the logs.

  3. Check the logs (optional):
    To check a crashed container or just have a peek at the logs, you can run this command on your terminal docker logs musicservice and it will display the logs for you. This is how you can do debugging, find out if everything is working like it should or if there are any errors.


Managing your playlist list

:information_source: Tip: You can update the playlists file while the container is running. If you made any changes, they will be in effect the next time it checks for newly added music. Default INTERVAL is 5 minutes.

  1. You can update which playlists to download here: /config/playlists
  2. On your machine open up a terminal.
  3. With docker volume inspect config you can see the directory location of the volume.
  4. Go to that directory, go into the _data directory and there you will find the playlists file,
  5. Edit the playlists file with your favorite editor like Nano :), and add every playlist/song that you want to add as a new line. Like this:
    youtube.com/playlist1
    youtube.com/playlist2
    youtube.com/video3
    
  6. Save the file, and the next time the container runs or checks for newly added songs, it will look at the playlists file for any updates.


How to best migrate from existing youtube-dl solution

If you where already using youtube-dl with the archive function, you probably have an downloaded.txt or similar file with all the songs you have already downloaded.

  1. :warning: Shut down the musicservice container first

  2. To migrate, just copy the contents of the old file over to the /config/downloaded file. You can find that file at the musicdatabase volume

  3. Run docker volume inspect config at your command line to find the location of that volume on your disk

  4. Open the file, paste the old information in and save it.

  5. That’s it!


Join the team 👪

Feel free to contribute, you can submit issues here and fix issues/bugs, improve the application!


Developer instructions 👩🏻‍💻👨🏻‍💻

System requirements: Have Docker (Desktop or Engine) installed on your system
Techniques: Python, Docker, YT-DLP and WebDAV

  1. 🤠 Git clone the project with git clone https://github.com/thijstakken/MusicService.git
  2. 🐛 Pick a issue from the list or create a new issue and use that one
  3. 🐍 Start editing the code (Python)
  4. 🏗 To build your new image, open a command line in the project folder and run docker build -t musicservice:dev .
  5. 🧪 For testing with Nextcloud, just do docker run -d -p 8080:80 nextcloud to start a fresh Nextcloud environment. When started, go to http://localhost:8080/ in some cases you have to replace localhost with your computers IP.

Use the docker compose file or use this Docker run command, and change it to your needs to get started:

docker run \
 --name musicservice \
 --restart=no \
 -v config:/config \
 -v musiccache:/music \
 -e URL=https://demo1.nextcloud.com/remote.php/dav/files/wpS97kPjnDJo6gGQ/ \
 -e DIRECTORY= \
 -e USERNAME=wpS97kPjnDJo6gGQ \
 -e PASSWORD=demo \
 -e INTERVAL=0 \
musicservice:dev
  1. 🎉 Use the develop branch and commit your feature to a new branch. When committing changes please use Gitmoji and close the corresponding issue with “fixed” and the number of the issue git commit -m ":bug: fixed #21 Your commit message"
  2. ⬆ Create a pull request
  3. 🚀 Wait for it to be reviewed and merged!

  4. Cleaning up, or starting over with testing:
    • Delete the container with: docker rm musicservice
    • Delete the config volume with: docker volume rm config
    • Delete the musiccache volume with: docker volume rm musiccache

Use at your own risk, never trust the code of a random dude on the internet without first checking it yourself :)